To access your reports, go to http://www.yourdomain.com/stats in your
web browser.
If you wish to run your own site analysis program, you are welcome to
download the entire log file (not recommended via modem due to size) and
process them with whatever program you want. These logs are stored on
the web server and you can ftp them by changing directory to /logs. This
is only setup on a request basis.
If you are going to be handling online transactions or are dealing with
sensitive data on your web site, you will need a SSL certificate installed on
our web server to encrypt the data going between the web client and our web
server.
SSL (Secure Socket Layer) is available on web packages above the economy level.
Depending on what web hosting package you have, there may be an additional fee
to enable SSL on your web site. We do have a shared certificate available
for use if you do not wish to purchase a certificate yourself. Please
contact our sales department (sales@nwnexus.com)
to see if your package qualifies for SSL.
If you are interested in SQL Server or SSL support, please contact support via email:
support@nwnexus.com.
Additional information on SSL is available at http://www.verisign.com or
http://www.thawte.com. These are the main
SSL certificate suppliers for the internet.
| Windows Hosting Server Platform: |
Microsoft Windows Server web sites are currently hosted on an Intel Platform,
running Windows NT 4 or Windows 2000 and Microsoft Internet Information Server
4.0/5.0 with FrontPage 2000 extensions. FrontPage allows you to update and maintain your
site directly on the server, simplifying site administration and allowing
you to create a professional site without extensive HTML experience. Front
Page 2002 extensions are available upon request.
Microsoft .NET Framework, Active Perl and PHP are available upon request for
all packages except Home Page Economy.
A directory can be setup for you (on request) to allow anonymous FTP
access to files. This directory is accessible at:
ftp://ftp.yourdomainname.com/filename
Your account has full control over this directory, anonymous FTP users
have read only access (for security reasons) to it. You can upload files
to this directory by ftp'ing to:
**** Anonymous FTP will NOT be
turned on if FrontPage is enabled on your web site ****
You can run CGI, PERL (Active Perl 5.8), PHP4 and Visual Basic scripts on your server.
These files should be placed in the /cgi-bin directory that is located
under your main directory. If you have any questions about what scripting
we support, please contact support@nwnexus.net.
To use AspEmail in an ASP environment, you must create an
instance
of the AspEmail object in your ASP script as follows:
<%
...
Set Mail =
Server.CreateObject("Persits.MailSender")
...
%>
To use AspEmail in a VB environment, open a VB project, go to
Project/References...
and check the box next to Persits Software AspEmail 4.1. Declare
an AspEmail object variable as follows:
Dim Mail As
MailSender
Create an instance of the AspEmail object as follows:
Set Mail = New
MailSender
To send email messages, AspEmail "talks" to an SMTP server. You must
specify the SMTP host address and, optionally, port number as follows:
Mail.Host =
"smtp.halcyon.com"
Mail.Port = 25 '
Optional. Port is 25 by default
You must also specify the sender's email address and, optionally, name
as follows:
Mail.From =
"sales@mycompany.com"
Mail.FromName = "Sales
Department" ' Optional
To add the message recipients, CCs, BCCs, and Reply-To's, use the
AddAddress,
AddCC, AddBcc and AddReplyTo methods, respectively. These methods accept
two parameters: the email address and, optionally, name. Notice that you
must not use an '=' sign to pass values to the methods. For example,
Mail.AddAddress
"jsmith@company1.com",
"John Smith"
Mail.AddCC
"bjohnson@company2.com"
' Name is optional
Use the Subject and Body properties to specify the message
subject and body text, respectively. A body can be in a text or HTML format.
In the latter case, you must also set the IsHTML property to True.
For example,
Mail.Subject = "Sales
Receipt"
Mail.Body = "Dear
John:" & chr(13) & chr(10) & "Thank you for your business.
Here is your receipt."
or
Mail.Subject = "Sales
Receipt"
Mail.Body =
"<HTML><BODY
BGCOLOR=#0000FF>Dear John:....</BODY></HTML>"
Mail.IsHTML =
True
To send a file attachment with the message, use the AddAttachment method.
It accepts the full path to the file being attached. Call this method as
many times as you have attachments. Notice that you must not use the '='
sign to pass a value to the method:
Mail.AddAttachment
"c:\dir\receipt.doc"
To send a message, call the Send method. The method throws exceptions
in case of an error. You may choose to handle them by using the On Error
Resume Next statement, as follows:
On Error Resume
Next
Mail.Send
If Err <> 0
Then
Response.Write "An error occurred: " & Err.Description
End
If
:
use Net::SMTP;
$smtp = Net::SMTP->new('here.com'); # connect to an SMTP server
$smtp->mail( 'user@here.com' ); # use the sender's address here
$smtp->to('user@there.com'); # recipient's address
$smtp->data(); # Start the mail
# Send the header.
$smtp->datasend("To: user@there.com\n");
$smtp->datasend("From: user@here.com\n");
$smtp->datasend("\n");
# Send the body.
$smtp->datasend("Hello, World!\n");
$smtp->dataend(); # Finish sending the mail
$smtp->quit; # Close the SMTP connection
Another alternative is Mail::Sender, which can be used like so:
use Mail::Sender;
$sender = new Mail::Sender {smtp => 'mail.yourdomain.com', from => 'your@address.com'};
$sender->MailFile({to => 'some@address.com', subject => 'Here is the file',
msg => "I'm sending you the list you wanted.",
file => 'filename.txt'});
Or Mail::Sendmail, which can be used like this:
use Mail::Sendmail;
%mail = ( To => 'you@there.com',
From => 'me@here.com',
Message => "This is a minimalistic message"
);
if (sendmail %mail) { print "Mail sent OK.\n" }
else { print "Error sending mail: $Mail::Sendmail::error \n" }
If you used to have your site at another URL address and want people to see your new site and they only know
your old address, you might need something like this to re-direct hits to
your new site. Replace all the 'generic' stuff with your specific
information, and put this in place of your OLD index.html file(s):
This will reload to the new location in eight seconds. Feel feel to use
variations on the theme.
| User Authentication using Active Server Pages:
|
This explains how to use active server pages and an Access database to authenticate
a user to your website and grant them access to protected pages. This example
provides the basics of how to accomplish this.
This example uses ASP session variable (browser cookies required) to store information
about the user. This is the simplest way to implement password protection, but not
the most secure. Using NTLM is more secure, but is not always feasible in a shared
server environment. This example is intended as a starting point for how to do user
authentication when NTLM is not an option.
Create the User Database:
For this example, we will use a Microsoft Access database file. You can use any
ODBC compliant database however.
Basically you want to create a table that has two columns:
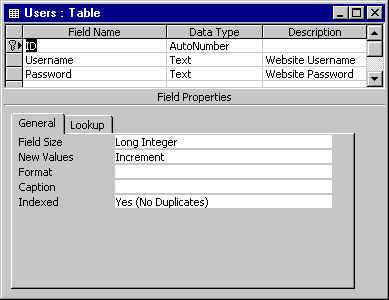
For this example, I've created a table called "users". You can enter
your usernames and passwords directly into access for each of your website's users.
Note: If you've created a new database for this table, you will need
to have a DSN registered. Contact technical
support to have the DSN setup for you once you have your database on the server.
Creating the login form
The next step is to create a login form where the user will enter their username and
password. Here's a sample form:
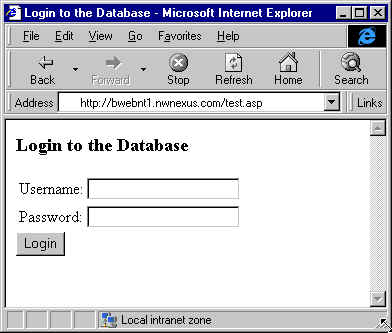
And here's the ASP for that page:
<TITLE>Login to the Database</TITLE>
<H3>Login to the Database</H3>
<P>
<FORM ACTION = "validate.asp" METHOD = "POST">
<TABLE BORDER = 0>
<TD>Username:</TD>
<TD><INPUT TYPE = "Text" NAME =
"Username"></TD></TR>
<TD>Password:</TD>
<TD><INPUT TYPE = "Password" NAME =
"Password"></TD>
</TABLE>
<INPUT TYPE = "Submit" Value = "Login">
</FORM>
Notice that the form handler for this script will be validate.asp
Creating the validation script:
The validation script will take the username and password that the user supplied, look
them up in the database and if they match set some session variables and redirect the user
to the appropriate page. If they don't match, it will send the user to a different
page.
Here's the code for validate.asp:
<%
Set conn = server.createobject("ADODB.Connection")
conn.open "Users"
set rs = conn.execute("select id, password from users where username = '" &
Request.Form("Username") & "'")
If rs.eof = "True" then
Response.Redirect "denied.asp"
End If
Password = rs("Password")
id = rs("id")
conn.close
set conn = nothing
if Password = Request.Form("Password") then
session("username") = Request.Form("username")
session("userid") = id
Response.Redirect "welcome.asp"
Else
Response.Redirect "denied.asp"
End If
%>
The first thing the script does is create the connection object. In this example,
we assume that the DSN for the access database is "Users" and that their is no
username and password for the database.
Next the script executes a SQL script to look up the user's id and password from the
users table. It stores this information in the variables password and id and then
closes the connection object.
Next the script compares the values in the database with the values that the user
supplied. If the passwords match, it sets session variables:
session("username") and session("userid"). You may not need to
have both of these set. These variables are important because they will be used
later to make sure that the user has been logged in. Once these variables have been
set, the script redirects the user to a welcome.asp page. If the password that the
user supplied does not match, they are redirected to denied.asp.
Password protecting a page:
To password protect an ASP page, you just need to include an include file reference at
the start of the page. Include files (.inc) can be processed by the server as part
of the requested page. For this example, we will create a file called logintest.inc.
The script will check to make sure that the session("username") has been
set. If not, it will redirect the user back to denied.asp.
Here's the code for logintest.inc
<%
If session("username") = "" then
Response.Redirect "denied.asp"
End If
%>
An example of how to protect a page would be welcome.asp. Here's how you would
include the login test for that page:
<!-- #INCLUDE FILE = "logintest.inc"
-->
Welcome <%=session("username")%>
If the user tries to go directly to this page, they will be redirected to the
denied.asp page. If the user comes to the page after going through the login page,
it will load. You just need to include the include file reference at the start of
every page that you want to password protect.
Copyright