
A. This document assumes that you already have Dial-Up
Networking installed in Windows 95. If this is not the case, then you need
to read the FAQ Connecting to
Northwest Nexus using Windows 95
Here are the steps to get Exchange working:
1. Go to "My Computer" icon on the Desktop and double click it.
2. Double click on the Control Panel icon.
3. Go to the "Internet" icon in the
Control Panel. Make sure the "Use
Autodial" option is checked.
If you don't have Internet icon in the
Control Panel, skip to Step
4 -- don't worry about it, only Microsoft
Plus users and those who
downloaded MS Internet Explorer will have
this icon.
a. make sure the name
of the Dial-Up Networking icon you created for
NW Nexus is in the text window under "Choose the Dial-Up
Networking connection used to dial the Internet"
b. If it isn't in there
then click on the drop down box button to
the right to select the icon's name for NW Nexus.
c. Click the "OK" button.
4. Double click on the "Mail and Fax"
icon in the Control Panel. The
first tab should be "Services."
In the window below the text "The
following information services
are setup in this profile," there
should be an item named
"Internet Mail."
a. If it is not there,
then click on the "Add" button and select
"Internet Mail." Click on "OK" to add it.
b. If "Internet Mail"
is already there, then select it and click
on the "Properties" button.
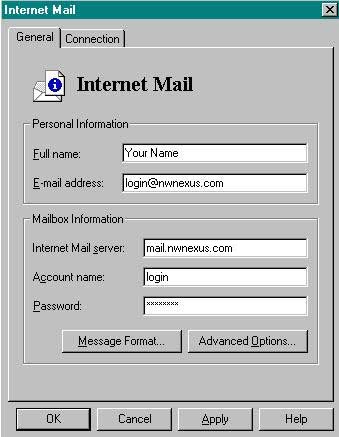
5. Fill in the fields as shown below:
| Full Name: | Your Name |
| Email Address: | login@halcyon.com |
| Internet Mail Server: | mail.nwnexus.com |
| Account Name: | login |
| Password: | (same as your login password) |

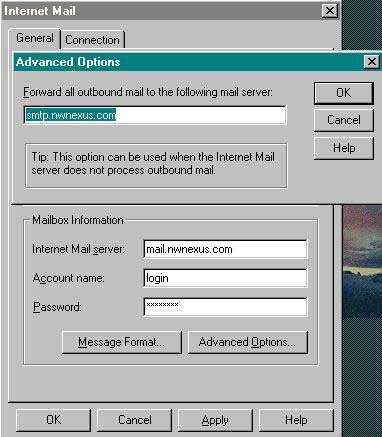
6. Click on the "Advanced Options" button and fill out the outbound mail field with smtp.nwnexus.com. Below is an example picture. Next, click the "OK" button.
Advanced Options settings window

7. Click the "OK" button. Close the Control Panel.
8. Open Exchange by clicking on the "Inbox" icon.
Q. How do I check mail?
1. Go to "Tools" and then to "Deliver Now." If multiple
options show up just to the left of "Deliver Now," then select "Internet
Mail." Your new email will show up in your "In" box and will have a bold-face
type for the message headers.
2. To deliver mail, Go to your Out box and highlight all the messages; then go to "Tools" and then "Deliver Now."
3. If you are not connected and you go to Deliver Now, Exchange will dial out automatically, using the Dial-Up Network connection. It will send and check mail with the Deliver Now command. This automatic dialing was set when we went to the Internet icon found in the Control Panel and checked on "Use AutoDial" and when the dialer for Northwest Nexus is selected below this.
Q. How can I set up Exchange to use multiple POP accounts?
A. Exchange has a feature where you can setup multiple Follow these steps:
1. Open Exchange.
2. Go to "Tools" and click on "Options."
3. The "General" tab should be at the
front. Goto the semibox that is
titled "When starting Microsoft
Exchange." Then click on the radio
button beside "Prompt for
a profile to be used."
4. Close Exchange, then double click on the Inbox again.
5. A window will appear titled "Choose Profile." Hit the "New" button.
6. Make sure the radio button for "Use
the following Information
services" is filled in,
and that "Internet Mail" is checked. Click
on the "Next" button at
the bottom.
7. Change the Profile name to "Northwest Nexus." Click "Next."
8. Make sure the radio button beside
"Modem" is filled in. Click
"Next."
9. Make sure the connection selected
is the one you have created for
NW Nexus in Dial-Up Networking.
If not, press on the drop-down box
button on the far right
hand side of the field box to select the
correct Dial-Up connection
name. Click "Next."
10. Make sure the radio button beside "Specify
the name" is filled in.
Enter "mail.nwnexus.com"
(no quotes) in the field box. Click
"Next."
11. Leave the radio button next to "Offline" filled in. Click "Next."
12. Fill in your full email address in the form:
login@halcyon.com
...and put in your full name in the full name field box.
13. Put your login name in the Account Name
field. Put your password
in the password field.
Click "Next."
14. Leave the directory for the Personal Address
Book file as "Default"
and click on "Next."
15. Click on "Finish."
Now, everytime you open Exchange you can choose whichever email account
you
want to go into. Just choose the profile by pressing on the drop
down box
button to drop down the list of profiles you have configured for each
email
account.