
![]()
You can find CuteFTP 2.0 by going to http://cuteftp.com/. At CuteFTP's homepage, click on the link "Download" which is right below the title banner for CuteFTP 2.0. You are required to register first before downloading. Make sure that the Select Language and OS field is set to the proper operating system of your PC. There are three selections Win95/NT4.0, Win 3.1, and Win NT 3.51. Then just click on the Submit button.
In this FAQ, the settings shown for CuteFTP 2.0 are set to upload or download to a user's personal web directory.
Q: Why do I need CuteFTP?
A: CuteFTP will allow you to upload and download files. Every Premium and Personal dialup account comes with 5 megs of user space that you can put up your own web page, so you might as well learn how to put up your personal web pages with an FTP program like this one.
Q: How do I set up CuteFTP?
A: In this example, we will configure CuteFTP to upload and download to a web directory for a Personal or Premium Dialup account. Let's say the login is "joeuser." You would substitute your login name in place of joeuser in the
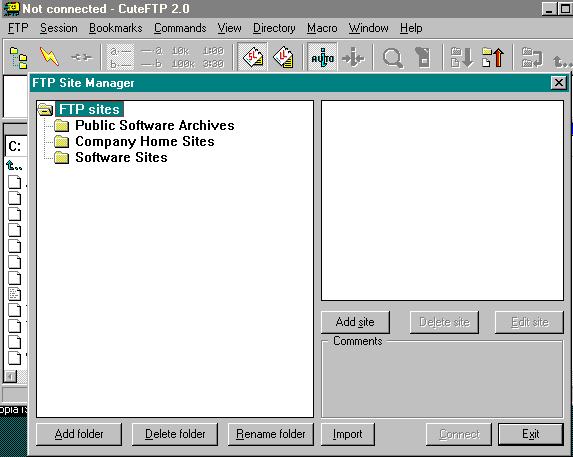
1) Double click on the Shortcut for CuteFTP. An FTP Site Manager window will show up in front of CuteFTP automatically. The FTP Site Manager is the window to allow you to view lists of FTP servers you can save settings to and connect to in the future. Below is a picture of the FTP Site Manager window.

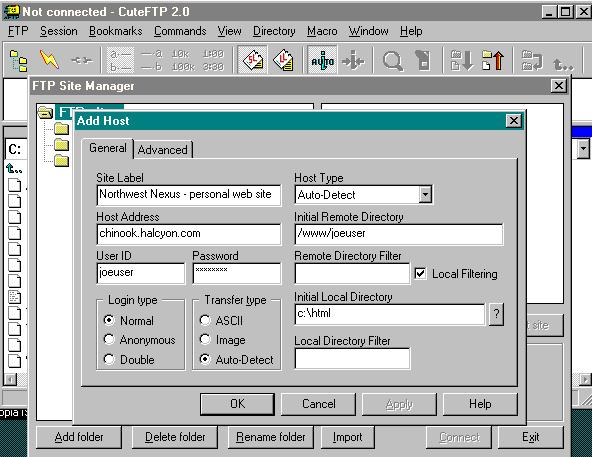
2) On the FTP Site Manager, click on the "Add site" button. A window called "FTP Site Edit" will show up. Fill in the following fields.

3) Click on the OK button.
Q: How do I upload files?
A: Again, we will use the example of uploading to a personal web page directory for a Personal or Premium Dialup account. NOTE: When you upload a file, if there is a file of the same name at the upload location, it is automatically overwritten.
1) After dialing into us, from the main menu, click on "FTP" and select
"Site Manager."
2) Select the entry called "Northwest Nexus - personal web site."
3) Click on the "Connect" button on the bottom left site of the Site Manager window.
4) In the left window, select the file to upload by pointing your mouse pointer on
the desired file and click on the left button once.
5) From the main menu, click on "Commands," and then on "Upload." Once the upload begins,
you will see a progress bar, which tells how much of the file you have uploaded.
To upload more than one file, do the following:
1) In the left window, select the first file to upload by left clicking on the desired
filename just once.
2) Next, while holding down the "CTRL" key, left click on the second file
and any successive files. Once you have all the desired files selected, let go of
the "CTRL" key.
3) Then go up to "Commands" in the main menu and select "Upload." This will
upload all the files selected.
Q: How do I download a file?
A: Follow the steps below to download a file
1) Using the same connection to the same server, In the right window, select the
file to upload by pointing your mouse pointer on
the desired file and click on the left button once to highlight the filename.
2) From the main menu, click on "Commands," and then on "Download." Once
the download begins, you will see a progress bar, which tells how much of the file
you have downloaded.
To download more than one file, do the following:
1) In the right window, select the first file by clicking on left mouse
button once with the mouse pointer over the desired filename.
2) While holding down the "CTRL" button, in the left window, select the second file
and any succeeding file to upload by left clicking on the desired filename
by on the left mouse button once.
3) From the main menu, select "Commands" and then click on "Download." All the
files selected will be downloaded one by one.