Northwest Nexus Frequently Asked Questions
Mac OS


Setting Up FreePPP for Northwest Nexus

Getting FreePPP

First off, you must obtain FreePPP. We recommend using version 2.5 or higher, but not the beta versions of the program. FreePPP is produced by Rockstar Studios, and can be downloaded from their website, http://www.rockstar.com.

Once downloaded, simply run the installer.


Setting Up FreePPP

  1. Once installed, find the program "FreePPP Setup" on your system. If selected when installed, FreePPP will include it's own FreePPP menu and control strip which you can run this from. If you don't know where these are, you can search for FreePPP Setup by going to your File menu (under Finder) and choosing Find. Then search for FreePPP on all local disks and it should show FreePPP Setup in the list, then double click on it.

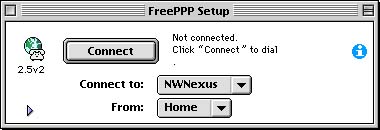
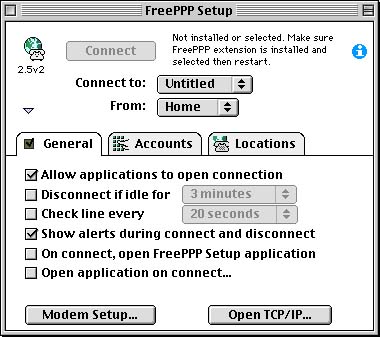
    Once you open FreePPP Setup it should look like this picture (some versions may vary). If the window only contains the top half, click on the purple arrow in the bottom left corner to expand the window.

    If you see the message about it not being installed, make sure that FreePPP extension is in your System/Extensions folder and enabled, then restart your machine.

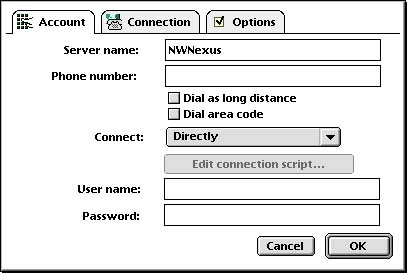
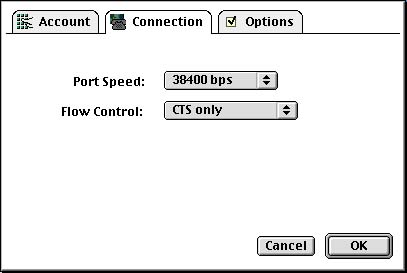
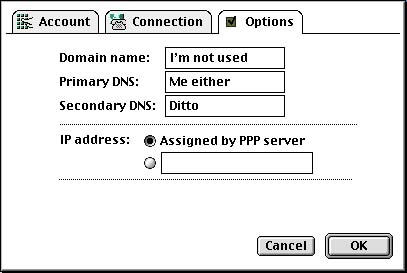
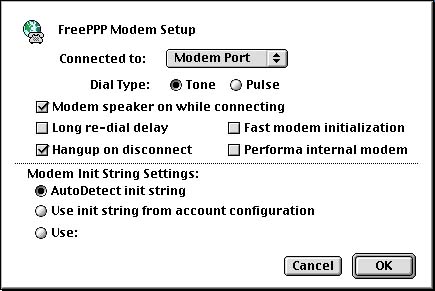
    Change the settings so they are identical to the ones in this picture.


  2. Go ahead and click on Modem Setup in FreePPP Setup and this screen should appear. Make sure your modem is set to these settings. If the connection does not work, you may have to specify a modem init string for your particular modem. Also, if you have a Performa internal modem, do check that box. When done, press OK and it will take you back to FreePPP Setup.


  3. Next, click on the Accounts divider and it should change to a screen similar to this picture. Click Edit to edit the existing account if it's labeled Untitled. If you are using more than one Internet Provider, it may be a good idea to click new instead.


  4. Once you click Edit or New, a screen like this should appear. Title the connection NWNexus, and enter the phone number you will be calling and enter your user name (lowercase) and password (remember, it's case sensitive). Set the other settings the same as they are here then click on Connection divider.

    A list of our phone numbers is available in our FAQ, "Dialup Access Numbers". Please remember to enter the area code before the phone number, since this will be required in the near future by the phone company.


  5. Set the Port Speed to 38400. Generally, this is a safe speed to choose because not all Macs can support higher speeds. A 14.4K modem can be set to as high as 57600 and a 28.8/33.6K to 115200 bps. Flow Control should be set to CTS only. Once done, click on Options divider.


  6. This area should be left as it is show here, so go ahead and press OK and making sure. That will take you back to the Accounts divider in FreePPP Setup. Go ahead and exit the program and restart your machine.


  7. Once you boot back up, go into FreePPP Setup again. You can shrink the box back down by clicking on the purple trangle, if it's still enlarged. Then go ahead and click Connect. Once logged on, the Connect button will change to Disconnect. Now you're free to go use your "client" applications such as Netscape. When you're done, click Disconnect and it will log you off the network.


Tips for those who are upgrading to FreePPP 2.5 from previous versions or other dialers:


Back to FAQ 
IndexReturn to FAQ Index Back to Topic 
IndexReturn to Topic Index