

Connecting
to Northwest Nexus via Windows NT 4.0
Microsoft's Windows NT 4.0 comes with everything you need to
connect to an Internet Service Provider like Northwest Nexus. Our
examination of what's provided and the alternatives, along with
months of extensive testing on our own everyday machines,
suggests that as of this writing, using the built-in networking
facilities is preferable to using other external packages, like
NetManage Chameleon or Trumpet Winsock. Even if you do need and
want those clients, you can get all of them in other freeware or
shareware programs available through the Internet.
You can run all of our favorite Internet client programs, like
Eudora for mail, WinVN or FreeAgent for news, and Netscape for
the Web with Windows NT 4.0 Dial-Up Networking.
To connect to Northwest Nexus, you'll need our personal PPP
Service. If you currently have Personal SLIP service, you can
change to Personal PPP at no charge -- simply send us email at:
support@nwnexus.net
...asking us to change your account from SLIP to PPP. Be sure to
tell us that you're using Windows NT95. We'll make the change by
the next business day, in most cases.
Although Windows NT 4.0 comes with useful online help, we
recommend you use our step-by-step method described below. We
have found that this gives more consistent results.
Note: This document assumes that most of NT's
networking components were included at installation time.
If you have questions at any time, or the FAQ isn't clear, then
please contact Technical Support.
Step 1 -- Install the Remote Access Service (RAS)
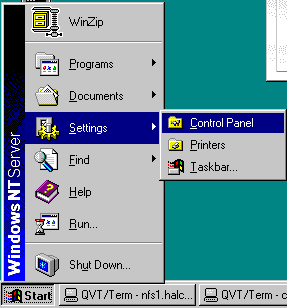
- Click on the 'Start' button on the desktop.
- Go to 'Settings'.
- Click on 'Control Panel'.
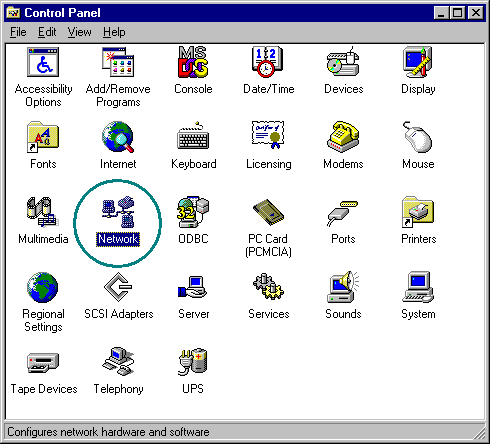
- Double click on the Network Control Panel.
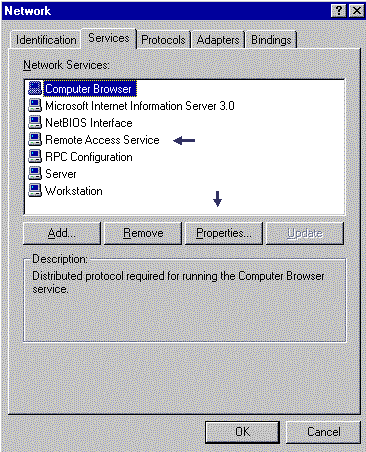
- Click on the 'Services' tab.
- Make sure that Remote Access Service (RAS) is on the list
of Network Services.
- If RAS is not installed, then
- Click the 'Add' button.
- Select Remote Access Service from the list of
available Services and click 'OK'
- Windows NT will then need to copy files off of
your Windows NT 4.0 CD-ROM.
- When NT is done copying files, you will return to
the main Network Control Panel Window.
- Highlight Remote Access Service with a single mouse
click.
- Click on the 'Properties' button.
Step 2 -- Configuring Remote Access Service
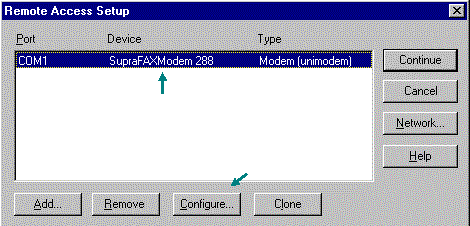
- Windows NT 4.0 should already know what modem you have
installed in your computer. If your modem is not listed
in the RAS Setup window, then NT is not properly
detecting your modem. Contact Technical Support so we can
assist you in configuring NT.
- If your modem is in the RAS setup window, then highlight
it and click on the 'Configure...' button.
- Under Port Usage, select Dial Out Only.
- Click on the 'OK' button.
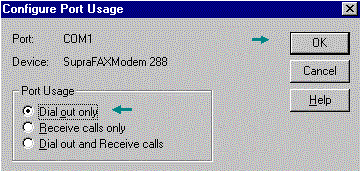
- Click on the 'Network...' button.
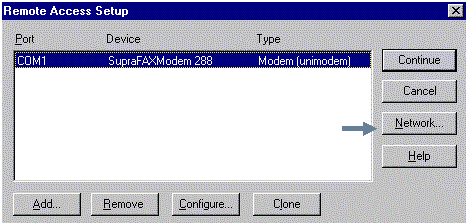
- Under Dial Out Protocols, select TCP/IP.
- Click on the 'OK' button.
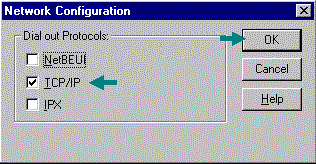
- Click on the 'Continue' button
- Click the 'OK' button.
- NT will then check, write, restore the bindings then a
message will appear asking if the computer should be
rebooted.
- Click 'Yes'
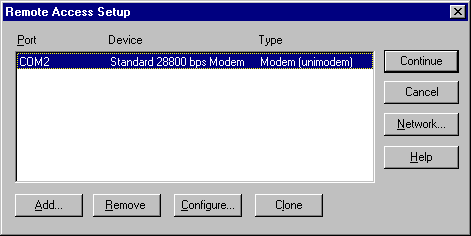
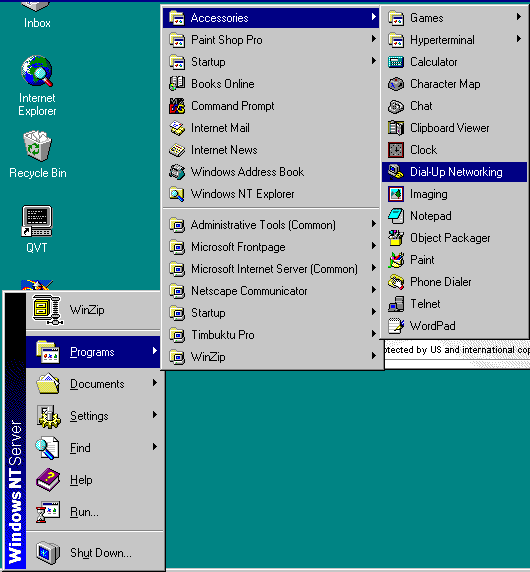
- Once the computer is done rebooting, open up Dial-Up
Networking by clicking on the Start button, then go up to
Programs, Accessories, then down to Dial-Up Networking.
Step 3 -- Configuring Dial-Up Networking (DUN)
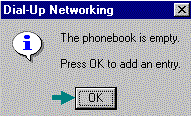
- Dial-Up Networking will report that the Phonebook is
empty. Click the 'OK' button.
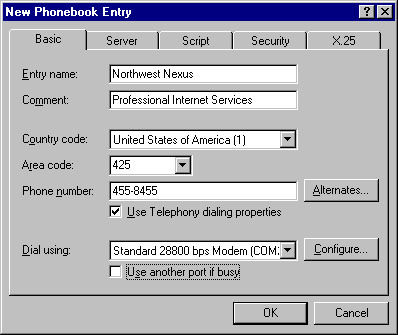
- Enter the name you would like for the connection, we
recommend something like Northwest Nexus or halcyon.
- Enter the area code of the number you are dialing.
***Please Note: If you are dialing a Northwest Nexus
access number that has a different Area Code then the
Area Code you are dialing from, then leave the Area Code
field blank and include the Area Code in the Phone Number
field. Otherwise NT will assume you want to dial
long-distance and will place a '1' in front of the phone
number.
- Enter the phone number that you will dial to connect to
Northwest Nexus. For a current list of Northwest Nexus
Access Phone Numbers, click here
Step 4 -- Configuring TCP/IP
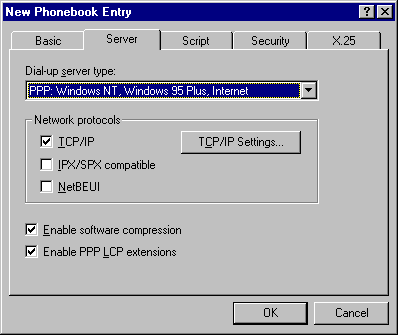
- Click on the 'Server' tab.
- Under Network Protocols, select TCP/IP
- Check both 'Enable Software Compression' and 'Enable PPP
LCP Extensions'.
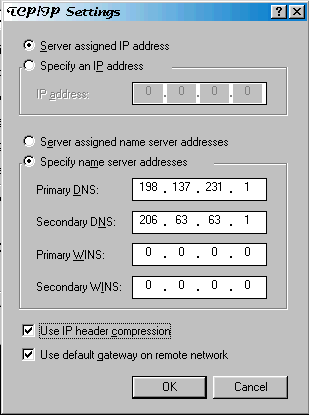
- Click on the 'TCP/IP' Settings... button.
- Select 'Server Assigned IP address'.
- Select 'Specify Name Server Addresses'.
- In the Primary DNS field, enter the following IP address:
198.137.231.1
- In the Secondary DNS field, enter the following IP
address: 206.63.63.1
- Check both Use IP header compression, and Use default
Gateway on remote network.
- Click on the 'OK' button.
Step 5 -- Configuring the rest of the Connection
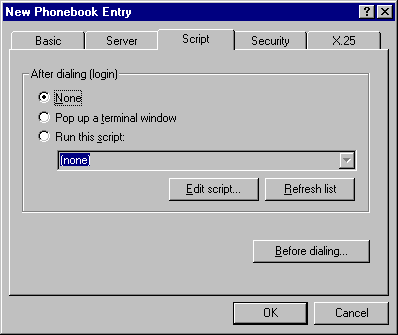
- Click on the 'Script' tab.
- Select 'None' under After dialing (login). You should not
need a dialing script for a PPP connection.
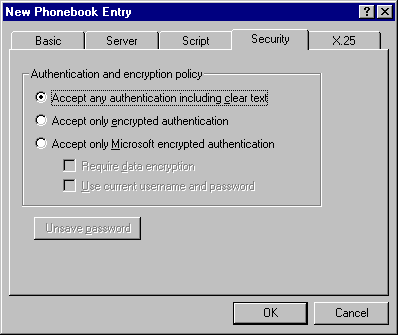
- Click on the 'Security' tab.
- Select 'Accept any authentication including clear text'.
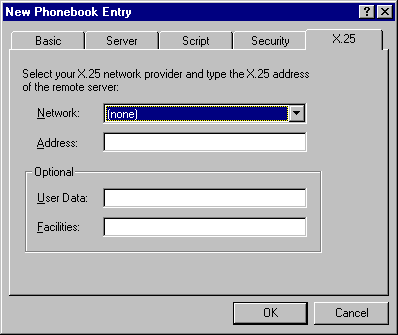
- Click on the 'X25' tab.
- Network should have 'None' selected.
- You should not need to change any settings on this tab.
- Click on the 'OK' button.
Step 6 -- Make the Connection
- Now we are ready to make the connection. Close any open
windows or programs that you have open.
- Click on the Start button, then go to Programs,
Accessories, then click on Dial-Up Networking.
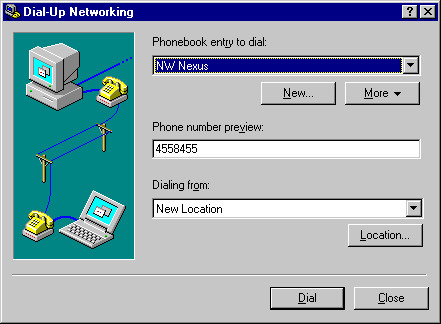
- This will bring up the Dial-Up Networking window.
- This window shows the telephone number you are dialing as
well as the name of the connection.
- Click on the Dial button.

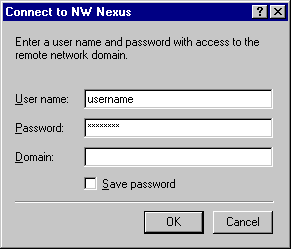
- This will bring up the Connect to NW Nexus Window.
- Enter your username or login ID. This is always enteret
in lower case.
- Enter your password. Your Password is case sensitive, so
things that are upper case are upper and lower case are
lower.
- The Domain dialogue box should be empty. You do not
need to enter any text here.
- Click on the OK button and the dialing process will
start.
You are now ready to
connect to Northwest Nexus and access the Internet. From the
Start Menu, select Programs, Accessories, Dial Up Networking and
get connected!


![]()


