| Connecting to Northwest Nexus using Win95 and Win98: |
Microsoft's Windows 95 comes with everything you need to connect to an Internet Service Provider likes Northwest Nexus. Our examination of what's provided and the alternatives, along with months of extensive testing on our own everyday machines, suggests that as of this writing, using the built-in networking facilities is preferable to using other external packages, like NetManage Chameleon or Trumpet Winsock -- if you don't need the extra clients and capabilities that come with Internet Chameleon. Even if you do need and want those clients, you can get all of them in other freeware or shareware programs available through the Internet, so there's even less reason to run Chameleon on Win95. NetManage may not be thrilled to hear us say that, but we always recommend the shortest and best path (if there is one that's both ;-) to our customers.
Note also, though, that because Win95 DUN is a V1.0 product, there are some bugs and strange behaviors in the Win95 network code, but our personal experience with using the Win95 Dial-Up Networking (DUN) software has been overwhelmingly good, surprisingly so. Microsoft has a Dialup Networking 1.2 patch available from their website as a free download. Win98 comes with this newer Dialup Networking already installed. In all, configuring Win98 for the internet is pretty much the same as Win95.
You can run all of our favorite Internet client programs, like Eudora for mail, WinVN or FreeAgent for news, and Netscape for the Web with Win95 DUN.
To use Win95's DUN connection capabilities, you need at minimum, our Personal PPP service. If you currently have Personal SLIP service, you can change to Personal PPP at no charge -- simply send us electronic mail at:
...asking us to change your account from SLIP to PPP. Be sure to tell us that you're using Win95. We'll make the change by the next business day, in most cases.
Some versions of Win95 (ie Win95 w/Microsoft Plus! Pack, Win95 Internet Explorer edition, and Win95B-OSR2) come with useful online setup wizards (such as the Internet Connection Wizard of Get On The Internet wizard). These wizards are usually located under Start/Programs/Accessories/Internet Tools. Usually, these setup wizards are rather simple to go through and will do a pretty good job of configuring everything all in one session. They will help you install a modem if you don't have one already in your Modem control panel; they will configure your Dialup Networking; Network Control Panel; and also email for Internet Mail or Windows Messaging. If you choose to setup your system with a wizard, make sure you DO NOT use the automatic setup, because this will attempt to sign you up with an internet account with a service such as MSN. Make sure you choose the option, I Already Have An Internet Service Provider or Manual Configuration. Also, if you have more than one Internet provider, you may want to choose the setup method below so it won't accidently interfere with your previous settings. We have found that this step-by-step method gives more consistent results than the other two methods.
The Client for Microsoft Networks files will be installed to your hard drive.
The TCP/IP files will be installed to your hard drive.

You may be prompted to restart your computer for network settings to take effect. You may do this now, or after you have completed all remaining configurations.
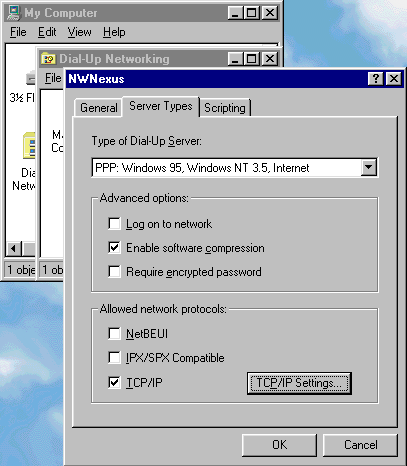
Below is how the Server Types window should look like after it is correctly configured. (Steps 16-19)

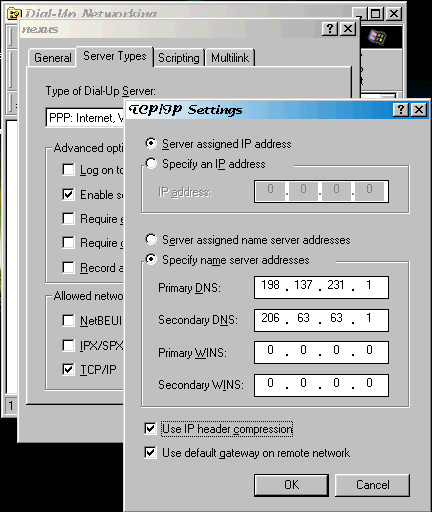
This is main area where Win98 differs in DUN. It will show several additional check boxes, but still only check the two as shown above in the Win95 picture. Below is a snapshot of what the TCP/IP Settings window should look like.
(Steps 20-24)

Don't forget to restart your computer if you didn't do so after configuring TCP/IP.
That's it for the setup portion -- now, on to using your connection for the first time.
It's easy enough to disconnect manually, but what if you want it to disconnect you automatically if you haven't used it in a while? This feature is built into Windows 95 Dial-Up Networking. Here is how you enable it:
You can have only one copy of a file called winsock.dll on your system in the path that's searched when programs run. This is the library that all the Windows Internet programs in the world call when they need to talk to the Internet. There are lots of different versions of that file; every manufacturer has their own. Netscape Navigator Personal Edition comes with one; Eudora Pro comes with one; Internet Chameleon comes with one; and on, and on. You can never use someone else's winsock.dll with the rest of the lower-level networking stuff, like dialers and TCP/IP stacks; you can use all the popular programs, like Netscape itself, Eudora, WinVN, FreeAgent, Mosaic, CU-SeeMe, and hundreds of others, with good stacks like the Win95 one.
So you need to be sure that you are using the Win95 winsock.dll, and that you didn't inadvertantly install another when you were using other software that came with a book, or when you installed that copy of Netscape PE that someone gave you for Christmas. If you've installed or run other network software, like Chameleon or Trumpet Winsock, you'll have their own winsock.dll files, too. Have we made this point emphatically enough?
Use Start/Find... to find:
winsock.dll
...on every drive in your system. Rename every single one of them except this one:
winsock.dll 42k 7/10/95 or 7/11/95 9:50am
That's the Win95, Version 1.0950 one. This file should be in c:\windows. If you find any copies of winsock.dll other than the one that's 42k in size and in the c:\windows directory, delete or rename them. And that should make things much, much better, in 95.0 out of 100 cases.
Windows 95 System Updates can be downloaded from Microsoft.
There's also a great Web page that is very helpful for troubleshooting/fine tuning Win95 in general. It's called "Windows 95 Annoyances", and can be found at: http://www.creativelement.com/win95ann/